


Get Requestly
When building modern applications, developers often need to test frontend components or external integrations without relying on real backend services. This is where a mock server becomes incredibly useful. A mock server simulates the behavior of a real API by returning predefined responses, making it easier to develop, test, and debug applications in isolation.
Node.js, with its lightweight and fast runtime, is a popular choice for setting up mock servers. Whether you’re developing a single-page application or working in a microservices architecture, a Node.js mock server can help you streamline your workflow, reduce dependencies during development, and improve testing reliability.
This tutorial provides a step-by-step guide to setting up a mock server using Node.js.
What is a Mock Server?
A mock server is a tool or service that mimics the behavior of a real API. It responds to HTTP requests with predefined data, simulating various scenarios without depending on the actual backend or external services. Mock servers are particularly useful during development and testing phases, allowing teams to work in parallel and isolate frontend and backend workflows.
Mock servers can be simple static configurations or dynamic systems that simulate real-world conditions, such as latency, errors, or different data states. By providing a controlled and consistent environment, mock servers help identify issues earlier and speed up the development cycle.
Why Use a Mock Server in Node.js Development?
Using a mock server in Node.js development offers several advantages:
- Parallel Development: Frontend and backend teams can work simultaneously. While the backend is still under development, the frontend can use a mock server to proceed with implementation and testing.
- Faster Testing: Tests that rely on live APIs can be slow or flaky due to network issues or API changes. A mock server ensures consistent and fast test results.
- Isolation: It allows applications to be tested without connecting to actual third-party services, preventing unintended side effects such as sending real emails or modifying live data.
- Error Simulation: Mock servers make it easy to simulate error responses (e.g., 500 or 404 errors) and test how the application handles them.
- Customization: Developers can create various response scenarios to simulate edge cases that are hard to reproduce with a live API.
Prerequisites for Setting Up Your Node.js Mock Server
Before setting up a mock server in Node.js, ensure that the following prerequisites are met:
- Node.js and npm Installed: Make sure Node.js (along with npm or yarn) is installed on the system. The latest stable version is recommended.
- Basic Knowledge of JavaScript: Understanding of JavaScript fundamentals and Node.js syntax is necessary for configuring the server and endpoints.
- Code Editor: Use a code editor such as Visual Studio Code for efficient project setup and file management.
- Command Line Access: Familiarity with using the terminal or command prompt for executing commands and managing packages.
- Requestly: Useful for testing mock endpoints and intercepting requests during development.
These prerequisites provide the foundation needed to build, test, and manage a mock server effectively within a Node.js environment.
Setting Up Your First Node.js Mock Server
To set up a basic mock server in Node.js, follow these steps:
1. Initialize the Project
mkdir mock-server
cd mock-server
npm init -y2. Install Express Express is a lightweight web framework for Node.js, ideal for creating mock servers.
npm install express3. Create the Server File Create a file named server.js and add the following code:
const express = require('express');
const app = express();
const port = 3000;
app.use(express.json());
app.get('/api/example', (req, res) => {
res.json({ message: 'Mock response from /api/example' });
});
app.listen(port, () => {
console.log(`Mock server running at http://localhost:${port}`);
});
4. Start the Server Run the following command to start the mock server:
node server.jsOnce started, visiting http://localhost:3000/api/example in a browser or API testing tool will return the mock response. This setup serves as the foundation for creating more advanced and dynamic mock endpoints.
Creating and Configuring Mock Endpoints in Node.js
With the basic server in place, additional mock endpoints can be created to simulate a variety of scenarios, including different HTTP methods, status codes, and dynamic data.
1. Handling Different HTTP Methods
Mock servers should respond to various types of requests. Here are examples:
// GET request
app.get('/api/users', (req, res) => {
res.json([{ id: 1, name: 'Alice' }, { id: 2, name: 'Bob' }]);
});
// POST request
app.post('/api/users', (req, res) => {
const newUser = req.body;
res.status(201).json({ message: 'User created', user: newUser });
});
// PUT request
app.put('/api/users/:id', (req, res) => {
const { id } = req.params;
const updatedData = req.body;
res.json({ message: `User ${id} updated`, updatedData });
});
// DELETE request
app.delete('/api/users/:id', (req, res) => {
const { id } = req.params;
res.status(204).send();
});2. Simulating Delays and Errors
To mimic real-world conditions:
// Simulate network latency
app.get('/api/delayed', (req, res) => {
setTimeout(() => {
res.json({ message: 'This response was delayed by 2 seconds' });
}, 2000);
});
// Simulate server
error
app.get('/api/error', (req, res) => {
res.status(500).json({ error: 'Internal Server Error' });
});3. Organizing Routes for Scalability
For better maintainability, mock routes can be moved to a separate file:
routes/users.js
const express = require('express');
const router = express.Router();
router.get('/', (req, res) => {
res.json([{ id: 1, name: 'Alice' }, { id: 2, name: 'Bob' }]);
});
module.exports = router;
server.js
const express = require('express');
const app = express();
const port = 3000;
app.use(express.json());
app.use('/api/users', require('./routes/users'));
app.listen(port, () => {
console.log(`Mock server running at http://localhost:${port}`);
});
This modular approach makes it easier to manage and update individual endpoints.
Running and Using Your Node.js Mock Server
Once endpoints are configured, the mock server can be run and tested effectively using development tools or by integrating it into a larger workflow.
1. Starting the Server
Use the terminal to start the server:
node server.jsIf using nodemon for auto-reload during development:
npx nodemon server.js2. Intercepting Requests with Requestly
With Requestly, developers can redirect requests from a live frontend to the local mock server.
Set up a Rule in Requestly to redirect API calls from the production endpoint (e.g., https://api.example.com/users) to the local mock endpoint (http://localhost:3000/api/users).
This allows testing frontend behavior against mocked responses without altering the frontend code.
3. Testing the Endpoints
Use browser, curl, or API tools to send requests:
curl http://localhost:3000/api/usersOr send a POST request:
curl -X POST http://localhost:3000/api/users -H "Content-Type: application/json" -d '{"name":"Charlie"}'4. Using in Frontend Development
Replace API base URLs in environment config files (e.g., .env.local) to point to the mock server during local development:
REACT_APP_API_BASE_URL=http://localhost:3000/apiBest Practices for Realistic Mocks in Node.js Development
The following best practices help achieve a robust Node.js mock server setup and ongoing maintenance.
1. Mirror the Real API Structure
To reduce integration friction, the mock server should behave as closely as possible to the actual API. This includes not just endpoints, but also naming conventions, response structures, and request handling patterns.
To achieve this, consider the following:
- Use consistent URL patterns, HTTP methods, and response formats.
- Include versioning (e.g., /v1/) if the real API uses it.
- Replicate headers, authentication flows, and query parameters as needed.
For example, if you want to create a versioned users endpoint that returns user data:
app.get('/api/v1/users', (req, res) => {
 res.json({ id: "123abc", name: "Alice Smith", email: "[email protected]" });
});
2. Keep Mock Data in External JSON or JS Files
Separating mock data from route logic improves maintainability and clarity. Organize mock data in dedicated files or folders to keep the server modular. Use libraries like Faker.js to generate dynamic data if needed.
3. Simulate Real-World Behaviors
A realistic mock server replicates production conditions such as latency and error rates. This helps frontend developers handle loading states and failures properly. Adding artificial delays and randomized error responses increases test coverage.
For example, simulate network latency and occasional failures with:
app.get('/api/data', (req, res) => {
const delay = Math.floor(Math.random() * 2000);
// up to 2 seconds
const fail = Math.random() { if (fail) {
res.status(500).json({ error: 'Internal Server Error' }); }
else { res.json({ message: 'Success', data: [1, 2, 3] });
} },
delay);
});
4. Use Middleware to Log and Debug Requests
Logging incoming requests and responses can help diagnose issues during development. Adding a simple middleware to log HTTP methods and URLs makes troubleshooting easier.
5. Structure Routes for Scalability
Group related endpoints into separate route files using Express Router. This keeps the codebase organized and easier to maintain as the mock server grows.
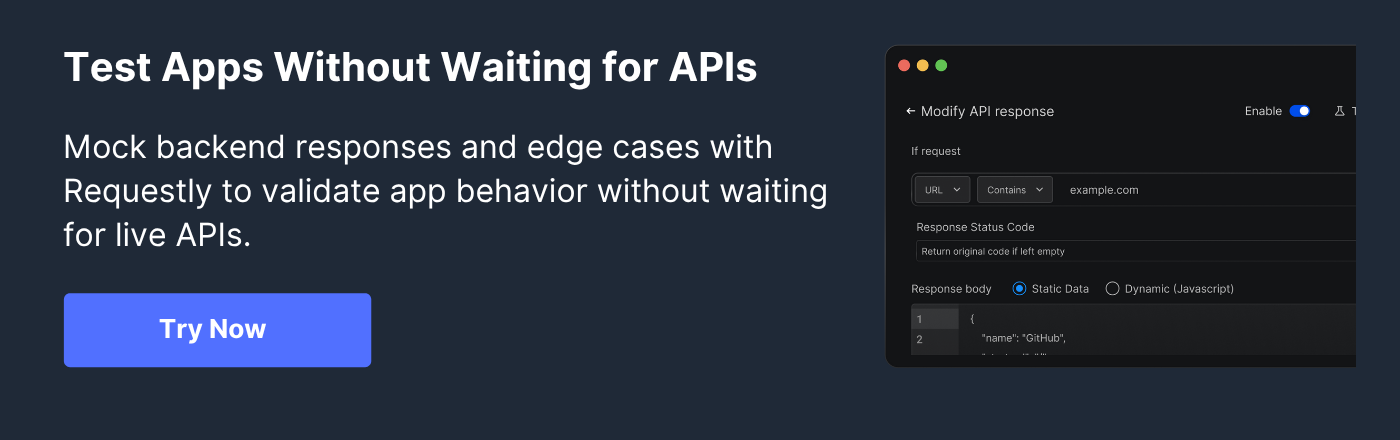
6. Enable Request Interception with Tools Like Requestly
Intercepting requests allows frontend apps to use the mock server transparently without changing code. Configure Requestly to redirect live API calls to your local mocks during development.
Here’s how:
- Install Requestly: Add the Requestly browser extension (available for Chrome and Firefox).
- Create a New Rule: Open Requestly and create a new Redirect Rule.
- Configure the Rule:
- Original URL: Enter the live API endpoint URL or a pattern that matches the requests you want to mock (e.g., https://api.example.com/v1/users/*).
- Destination URL: Enter the corresponding mock server URL running locally (e.g., http://localhost:3000/api/v1/users/).
- Save and Enable the Rule: Make sure the redirect rule is enabled.
- Test in the Browser: When the frontend app makes requests to the live API, Requestly intercepts and redirects those to your mock server automatically, without any frontend code changes.
7. Toggle Mocks Using Environment Variables
Enable or disable the mock server easily using environment variables. This allows switching between real and mock APIs without code changes.
For example:
if (process.env.USE_MOCK === 'true') {
app.use('/api', require('./routes/mockRoutes'));
}How to Maintain and Update Your Node.js Mock Server for Future Use
Keeping a mock server useful over time requires regular updates and maintenance aligned with the evolving real API and development needs. Follow these key practices to ensure the mock server remains reliable and relevant:
- Regularly Sync with Real API Changes: Monitor updates in the live API, such as new endpoints, changes in request/response formats, or deprecated features. Update mock routes and data accordingly to avoid mismatches.
- Version Your Mock Server: Maintain versioning in your mock server similar to the real API to support different frontend versions or testing scenarios, helping manage backward compatibility.
- Automate Data Refresh: Schedule periodic reviews or automate scripts to regenerate mock datasets, especially when mock data depends on evolving business logic or schemas.
- Keep Dependencies Updated: Regularly update libraries and tools used in your mock server to benefit from security patches, bug fixes, and new features.
- Write and Update Documentation: Keep documentation current by recording all changes, new routes, or modifications to help onboard new team members and avoid confusion.
- Test Your Mock Server: Integrate automated tests to verify mock endpoints behave as expected, catching regressions caused by updates.
- Collect Developer Feedback: Encourage the team to report inconsistencies or needed features, and iterate based on their input to improve the mock server.
Conclusion
Setting up a reliable Node.js mock server is crucial for faster development, better testing, and smoother frontend-backend collaboration. With the right structure and practices, your Node.js mock server setup can closely mirror real APIs, reduce integration issues, and support long-term maintainability.
For even greater flexibility, use Requestly to intercept and redirect network requests without changing frontend code. Its simple, rule-based system makes it easy to connect your mock server during development.


Get Started for Free