How to Block Cookies in Charles Proxy

Your lightweight Client for API debugging
No Login Required
Requestly is a web proxy that requires a desktop and desktop browser.
Enter your email below to receive the download link. Give it a try next time you’re on your PC!


Introduction
In Charles Proxy, the Block Cookies tool helps you block your browser from sending or receiving cookies, allowing you to test websites as if cookies are disabled. However, setting it up can be time-consuming. You first need to configure the proxy settings, ensure the SSL certificate is installed, and then manually set up rules to block cookies. While these steps are effective, they add complexity and require multiple steps before you can even start testing.
Once we’ve configured Charles Proxy, we’ll explore a tool that simplifies this process, offering a faster and easier configuration for the same task
Charles Proxy's Block Cookies Tool: How It Works
The Block Cookies tool removes the Cookie header from requests, preventing the client application from sending the cookie value to the remote server. It also removes the Set-Cookie header from responses, preventing the client application from receiving requests to set cookies from the remote server.
Setup Charles Proxy’s Block Cookies Tool
- Open Charles Proxy and ensure that your proxy is enabled and traffic is being captured.
- Navigate to the Tools Menu:
- In the top menu, click on Tools.
- From the dropdown, select Block cookies.
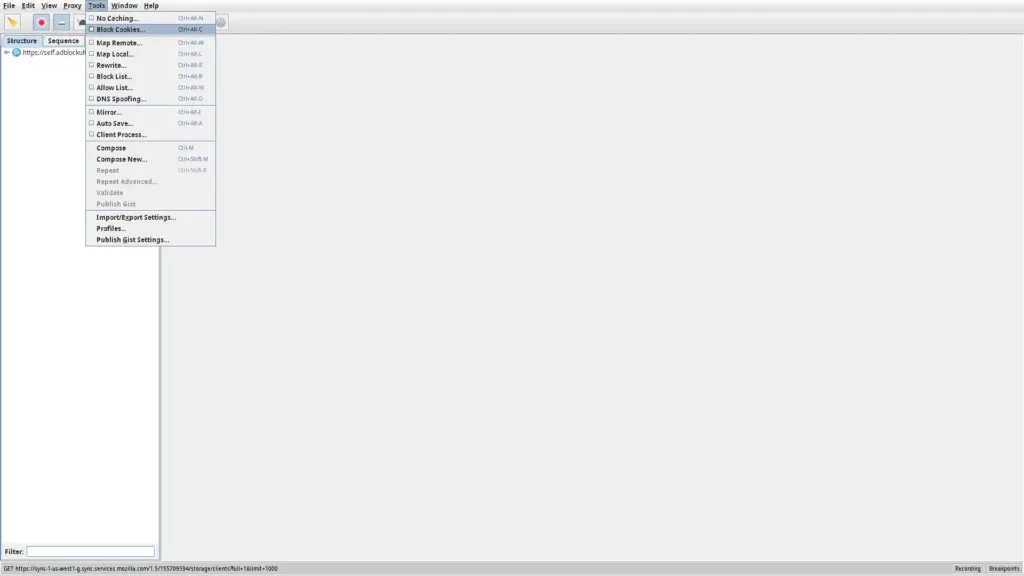
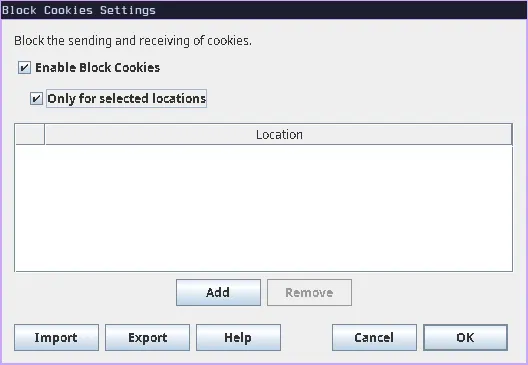
- This will open the Block Cookie settings window. Here, check the Enable Block Cookie box to block cookies on all the sites. You can also block cookies for specific locations by enabling selected location.
- Now click on add to add a new URL, we will use
setcookie.netto test the tool, you can select a location based on:- Protocol: Here you can select your site’s protocol HTTP or HTTS
- Host: Here you can enter the host/domain that you want to apply the rule to.
- Port: You can specify the port on which your site is running.
- Path: Define the path if you want the rule to apply only to specific paths on the host.
- Query: here you can define the query parameters that should be targeted.
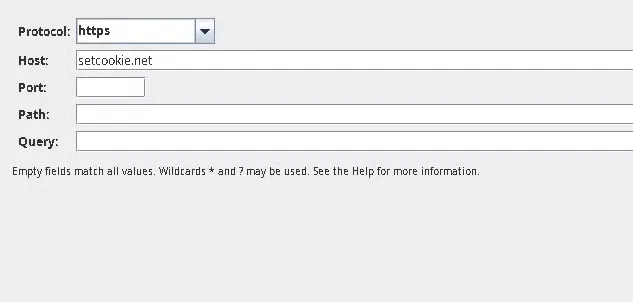
Now Save the rule by clicking OK.
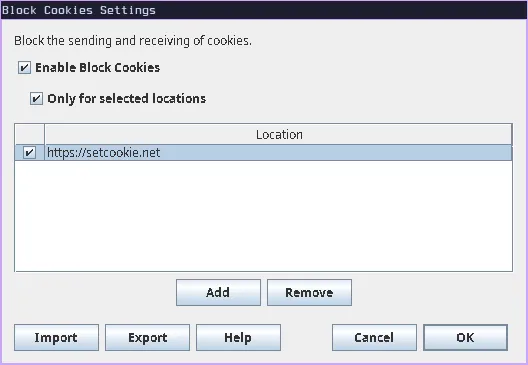
- After saving this you should be able to see the rule and its modifications
- Now visit the site you selected and you can see the URL change.
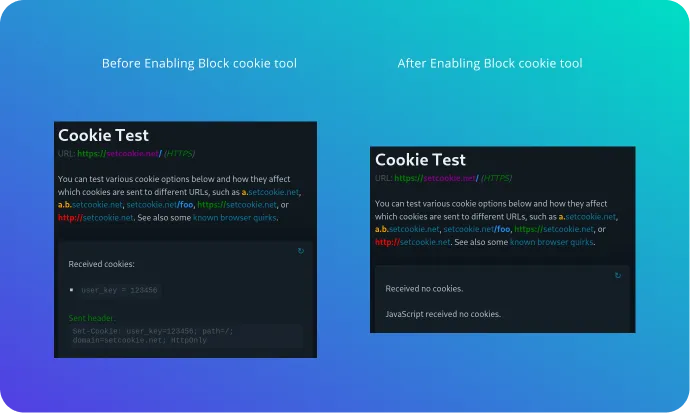
While Charles Proxy’s Block Cookie tool is highly useful during development, its setup can be complicated and time-consuming. Users often need to navigate through the Charles settings and define conditions to ensure accuracy. Additionally, as Charles is a desktop application, switching between your testing environment and the proxy can be cumbersome.
Requestly can make this process much simpler and smoother, saving you time and effort by managing everything in one place.
You can use the Modify header rule to replicate the same functionality in Requestly.
Modify Header rule in requestly
Say goodbye to complex setups with Charles Proxy and streamline your debugging workflow using Requestly’s Modify Header Request rule. While Charles Proxy requires multiple steps and has no browser extension to block the cookie, Requestly offers a faster, more intuitive solution directly within your browser. Easily simulate different devices or test API requests with just a few clicks—no need to switch between applications or configure complex rules.
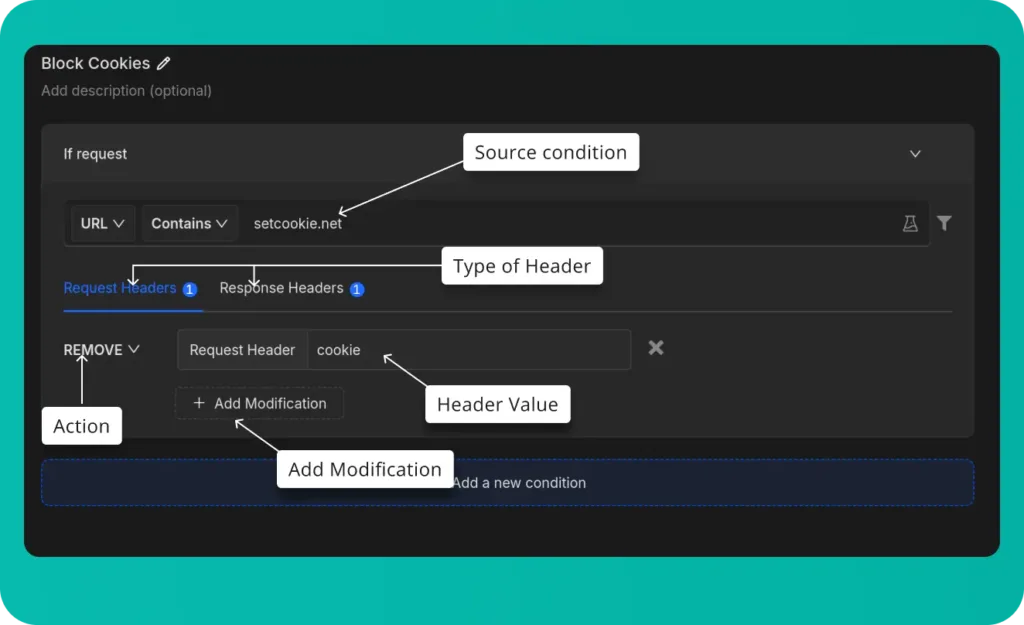
- Source Condition: This determines which requests will be redirected.
- Type of Header: Select the type of header you want to modify, you can add separate modifications to both
- Header Value: Enter the header you want to remove.
- Action: The type of modification you want to do to the header
- Add Modification: Include additional header modifications.
Configure Requestly’s Modify Header Rule
- Install Requestly Extension: Download and install Requestly’s browser extension.
- Open Requestly Dashboard: Visit app.requestly.io and log in.
- Click on the Rules tab and then select New Rule.
- Choose Modify Header as the rule type.
- Enter the URL or URL pattern in the Source Condition field.
- Specify the header you want to modify, add, or remove.
- Name your rule and click Save.
Now you can test it on your desired website, or if you do not want to go through the hassle of setting it up yourself, we have created a shared list of this rule for disabling cache for you. Go ahead and import it by clicking this button below.
Or create your own Rule by following the setups below
Other Use Cases for Requestly’s Modify Header Rule
Here are some key use cases for the Modify Header rule in Requestly:
- Bypass CORS: Bypass CORS restrictions during development and testing. Add or modify the
Access-Control-Allow-Originheader to test API requests from different domains, even when the server does not explicitly allow cross-origin requests. - Test Authentication Mechanisms: Modify headers such as
Authorizationto simulate being authenticated as different users or roles during testing. This is especially useful for testing API endpoints with various user permissions. - Security Testing: Block outgoing requests to simulate how your application behaves when certain endpoints are unreachable, helping to test error handling and fallback mechanisms.
- Dependency Isolation: Block requests to third-party services to test how your application functions when external dependencies are unavailable.
Migrate from Charles proxy
If you’re already using Charles Proxy, Requestly provides an easy way to import your settings. Follow the guide to migrate: Migrate from Charles Proxy.
Conclusion
I hope this article has given you a clear understanding of both the Block Cookie tool in Charles Proxy and how Requestly can achieve the same results with greater ease. While Charles Proxy effectively handles the task, Requestly offers a more streamlined and efficient experience.
Since Requestly operates directly from your browser and leverages built-in browser APIs, there’s no need for complex SSL configurations, eliminating the SSL issues often encountered with Charles Proxy. Plus, you don’t need to switch between different tools—everything you need is right in your browser.
Requestly’s exceptional support is reflected in its 4.4 ⭐ rating from over 1,200 users on the Chrome Web Store, proving it’s a great product with top-tier support.
Explore More
Contents
Subscribe for latest updates
Share this article
Related posts
Get started today
Requestly is a web proxy that requires a desktop and desktop browser.
Enter your email below to receive the download link. Give it a try next time you’re on your PC!


