HTTP Interceptor Patterns for Secure and Efficient API Communication

Introduction
HTTP interceptors let you modify HTTP requests and responses globally. With interceptors, you can manage authentication, handle errors, log activity, cache responses, and retry failed requests. These features enhance both the security and performance of your applications.
In this blog, we’ll look at different types of interceptor patterns you can use when developing http interceptors,
Understanding interceptor patterns will give you knowledge to help you decide which structure is best suited for your need. your application more control over your app’s communication with the server.
Design Patterns for HTTP Interceptors
In centralized interceptor pattern we will setting up all our HTTP interceptors in one place. This makes it easier to manage the interceptors and ensures that every HTTP request and response goes through the same checks. This is helpful for applications that need the same rules for all HTTP communications, like adding authentication headers or logging requests and responses.
Let’s demonstrate how to implement the Centralized interceptor pattern using Axios.
- Install Axios
First, ensure you have Axios installed in your project:
npm install axios
- Create a Centralized Axios Instance
Create a new file, axiosInstance.js, to set up your centralized Axios instance with interceptors:
// axiosInstance.js
import axios from 'axios';

// Create an Axios instance
const axiosInstance = axios.create({
  baseURL: 'https://api.example.com', // Replace with your API base URL
});

// Request Interceptor
axiosInstance.interceptors.request.use(
  config => {
    // Add an Authorization header
    const token = localStorage.getItem('authToken'); // Retrieve token from local storage
    if (token) {
      config.headers.Authorization = `Bearer ${token}`;
    }

    // Logging the request
    console.log('Request:', config);

    return config;
  },
  error => {
    // Handle request error
    return Promise.reject(error);
  }
);

// Response Interceptor
axiosInstance.interceptors.response.use(
  response => {
    // Logging the response
    console.log('Response:', response);

    return response;
  },
  error => {
    // Handle response error
    if (error.response.status === 401) {
      // Handle unauthorized error (e.g., redirect to login)
      console.error('Unauthorized, redirecting to login...');
    }
    return Promise.reject(error);
  }
);

export default axiosInstance;
Benefits :
- Consistency: Ensures uniform handling of all requests and responses across the application.
- Maintainability: Simplifies updates and maintenance by consolidating configuration in one place.
- Simplicity: Reduces complexity by avoiding scattered interceptor configurations.
Drawback :
- Monolithic Approach: Can become cumbersome if interceptors need to handle too many responsibilities, leading to a monolithic design.
- Lack of Flexibility: May not be suitable for applications with diverse requirements where different endpoints need different handling.
Chain of Responsibility Pattern
The Chain of Responsibility pattern sets up a series of interceptors, each one handling a specific part of HTTP requests and responses. This approach makes managing HTTP communications more flexible and modular. Each interceptor in the chain has one job, making the system easier to maintain and scale.
- Install Axios
First install Axios in your project:
npm install axios
- Create Separate Interceptors
Create different interceptors with different responsibilities in a separate file:
// Add auth token to the request
export const authInterceptor = config => {
  const token = localStorage.getItem('authToken');
  if (token) {
    config.headers.Authorization = `Bearer ${token}`;
  }
  return config;
};

// log the request
export const loggingInterceptor = config => {
  console.log('Request:', config);
  return config;
};

// handle unauthorized response
export const errorInterceptor = error => {
  if (error.response && error.response.status === 401) {
    console.error('Unauthorized, redirecting to login...');
    // Redirect to login or handle unauthorized error
  }
  return Promise.reject(error);
};

// Log the response
export const responseLoggingInterceptor = response => {
  console.log('Response:', response);
  return response;
};
- Set Up Axios Instance with Interceptors
Create an Axios instance and apply the interceptors in the desired order:
// axiosInstance.js
import axios from 'axios';
import { authInterceptor, loggingInterceptor, errorInterceptor, responseLoggingInterceptor } from './interceptors';

const axiosInstance = axios.create({
  baseURL: 'https://api.example.com', // Replace with your API base URL
});

// Apply request interceptors
axiosInstance.interceptors.request.use(authInterceptor);
axiosInstance.interceptors.request.use(loggingInterceptor);

// Apply response interceptors
axiosInstance.interceptors.response.use(responseLoggingInterceptor, errorInterceptor);

export default axiosInstance;
In this example, we created individual interceptors for authentication, logging, error handling, and response logging. By applying these interceptors in a specific order to the Axios instance, we can manipulate how HTTP request is processed in the application in a modular and organized manner.
Benefits :
- Modularity: Each interceptor is given a specific responsibility, making the codebase more organized and easier to manage.
- Flexibility: Interceptors can be added, removed, or reordered without affecting other parts of the application.
- Separation of Concerns: Ensures that each aspect of HTTP communication is handled independently.
Drawbacks :
- Complexity: Managing and understanding the flow of multiple interceptors can be more complex.
- Performance Overhead: Adding too many interceptors can introduce performance overhead due to the sequential processing of each request and response.
Conditional Interceptor Pattern
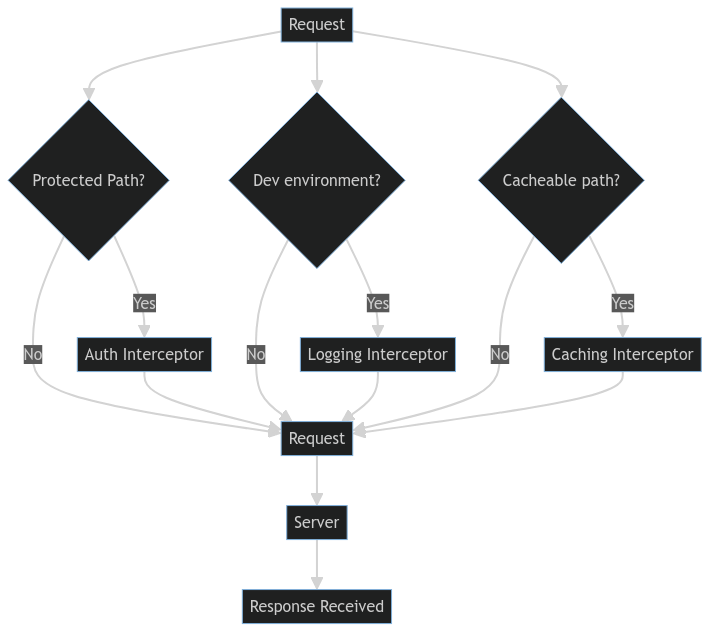
In Conditional Interceptor pattern we use interceptors based on certain conditions, giving us detailed control over how HTTP requests and responses are handled. This is useful when different requests need different interceptor or when specific conditions must be met before using certain interceptor functions.

Let’s demonstrate how to implement the Conditional Interceptor pattern using Axios.
- Install Axios
Ensure you have Axios installed in your project:
npm install axios
- Create Conditional Interceptors
Create interceptors that check for specific conditions before applying their logic:
// Add auth token only to protected routes
export const authInterceptor = config => {
  if (config.url.includes('/protected')) { // Apply only to protected routes
    const token = localStorage.getItem('authToken');
    if (token) {
      config.headers.Authorization = `Bearer ${token}`;
    }
  }
  return config;
};

// log response only in development mode
export const loggingInterceptor = config => {
  if (process.env.NODE_ENV === 'development') { // Apply only in development mode
    console.log('Request:', config);
  }
  return config;
};

// Send response from cache for specific routes
export const cachingInterceptor = config => {
  if (config.method === 'get' && config.url.includes('/cacheable')) { // Apply to GET requests for specific routes
    const cachedResponse = localStorage.getItem(config.url);
    if (cachedResponse) {
      return Promise.resolve(JSON.parse(cachedResponse));
    }
  }
  return config;
};

// Save response to cache for specific routes
export const responseCachingInterceptor = response => {
  if (response.config.method === 'get' && response.config.url.includes('/cacheable')) { // Cache specific responses
    localStorage.setItem(response.config.url, JSON.stringify(response));
  }
  return response;
};

// Handle only unauthorized errors
export const errorInterceptor = error => {
  if (error.response && error.response.status === 401) { // Handle only unauthorized errors
    console.error('Unauthorized, redirecting to login...');
    // Redirect to login or handle unauthorized error
  }
  return Promise.reject(error);
};
- Set Up Axios Instance with Conditional Interceptors
Create an Axios instance and apply the conditional interceptors:
// axiosInstance.js
import axios from 'axios';
import { authInterceptor, loggingInterceptor, cachingInterceptor, responseCachingInterceptor, errorInterceptor } from './interceptors';

const axiosInstance = axios.create({
  baseURL: 'https://api.example.com', // Replace with your API base URL
});

// Apply request interceptors
axiosInstance.interceptors.request.use(authInterceptor);
axiosInstance.interceptors.request.use(loggingInterceptor);
axiosInstance.interceptors.request.use(cachingInterceptor);

// Apply response interceptors
axiosInstance.interceptors.response.use(responseCachingInterceptor, errorInterceptor);

export default axiosInstance;
In this example, we created multiple interceptors that apply their logic based on specific conditions like request URL, HTTP method, and environment. By doing this, we can handle have a better control over requests and responses in our application.
Benefits :
- Granular Control: Allows for more precise application of interceptor logic based on request or response conditions.
- Improved Efficiency: Ensures that only relevant interceptors are applied, reducing unnecessary processing.
- Flexibility: Easily adaptable to handle varying requirements for different types of HTTP communications.
Disadvantages:
- Complex Implementation: Requires additional logic to determine when interceptors should be applied, increasing complexity.
- Maintenance: Keeping track of conditions and ensuring they are up-to-date can be challenging, especially in large applications.
Retry and Backoff Pattern
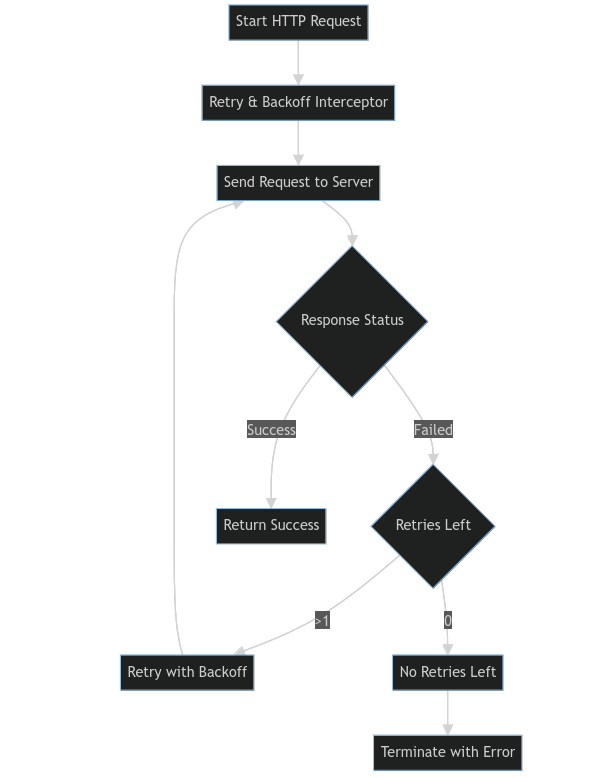
In the Retry and Backoff pattern web automatically retry failed HTTP requests, with each retry having a longer delay than the last. This is useful for handling temporary problems like network issues or server downtime, making communication between the client and server more reliable.

Let’s demonstrate how to implement the Retry and Backoff pattern using Axios.
Install Axios
Ensure you have Axios installed in your project:
npm install axios
Create a Retry and Backoff Interceptor
Create an interceptor to handle retries with exponential backoff:
// retryInterceptor.js
const retryInterceptor = (axiosInstance, maxRetries = 3, delay = 1000) => {
  axiosInstance.interceptors.response.use(
    response => response,
    error => {
      const config = error.config;
      if (!config || !config.retry) {
        config.retry = 0;
      }

      if (config.retry >= maxRetries) {
        return Promise.reject(error);
      }

      config.retry += 1;
      const backoffDelay = delay * Math.pow(2, config.retry);

      return new Promise(resolve => {
        setTimeout(() => {
          resolve(axiosInstance(config));
        }, backoffDelay);
      });
    }
  );
};

export default retryInterceptor;
Set Up Axios Instance with the Retry Interceptor
Create an Axios instance and apply the retry interceptor:
					// axiosInstance.js
import axios from 'axios';
import retryInterceptor from './retryInterceptor';

const axiosInstance = axios.create({
  baseURL: 'https://api.example.com', // Replace with your API base URL
});

// Apply the retry interceptor
retryInterceptor(axiosInstance, 3, 1000); // 3 retries with an initial delay of 1000ms

export default axiosInstance;
Here, we created a retry interceptor that automatically retries failed requests using an exponential backoff strategy. By applying this interceptor to the Axios instance, we can handle transient errors more effectively, improving the reliability and user experience of our application.
Benefits:
- Increased Reliability: Automatically retries failed requests, improving the robustness of API communication.
- Improved User Experience: Reduces the impact of transient errors on users by retrying operations without requiring user intervention.
- Optimized Network Usage: Implements exponential backoff to avoid overwhelming the server with repeated requests in a short period.
Disadvantages:
- Delay in Failure Detection: Introduces delays in detecting persistent failures, as the retries add to the overall time before an error is surfaced to the user.
- Increased Complexity: Requires careful management of retry logic and backoff timing to avoid excessive retries and potential infinite loops.
- Potential Resource Consumption: Repeatedly retrying failed requests can consume additional resources and bandwidth, which might not be ideal for all applications.
Conclusion
In conclusion, Each pattern offers unique advantages. By leveraging the strengths of different interceptor patterns, you can tailor your approach to best suit the specific needs of your application
Conditional Interceptor Pattern : Use this when you need to apply different interceptor logic based on specific conditions, such as request URL, HTTP method, or environment. Ideal for applications with diverse requirements where certain requests need specialized handling.
Contents
Subscribe for latest updates
Share this article
Related posts


