How to use Rewrite Header tool in Charles Proxy

Your lightweight Client for API debugging
No Login Required
Requestly is a web proxy that requires a desktop and desktop browser.
Enter your email below to receive the download link. Give it a try next time you’re on your PC!


Introduction
During local development you might want to override headers for various reasons like bypassing CORS locally to work with production files etc.
“Rewrite Header” comes handy in such cases where you can overwrite HTTP Headers from request and responses without making any changes to your codebase.
Rewrite Header can also be used to:
- Simulate different UserAgents
- Inject or Modify Authentication Tokens
- Testing Localization and Language Preferences
Setting up Rewrite Header in Charles Proxy is a little complex. You can follow the steps below to configure Rewrite Header with ease.
Browser Extension, that just needs you to fill 1 field and doesn’t have VPN issues, is also explained later in this post. You can also use that in place of Charles Proxy.
Charles Proxy's Rewrite Header Tool
Configuring the Rewrite Header tool in Charles Proxy can be a time-consuming process. It requires navigating through a series of options, which can be difficult to find and set up, especially for users unfamiliar with the tool.
How to Configure Charles Proxy’s Rewrite Header Tool
- Open Charles Proxy and ensure that your proxy is enabled and traffic is being captured.
- Navigate to the Tools Menu:
- In the top menu, click on Tools.
- From the dropdown, select Rewrite.
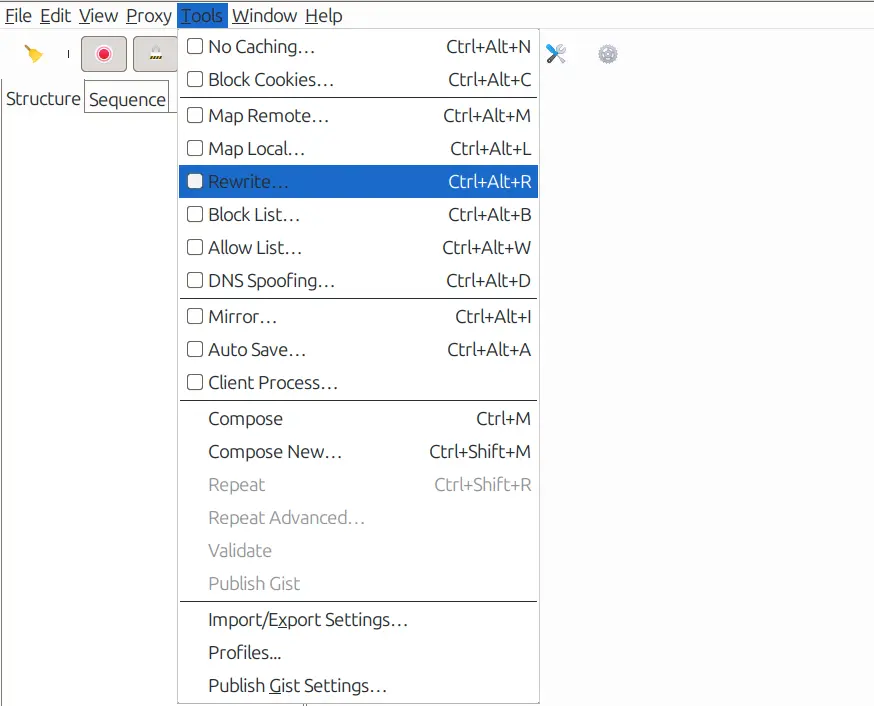
- This will open the rewrite settings window Here check Enable rewrite box and click Add
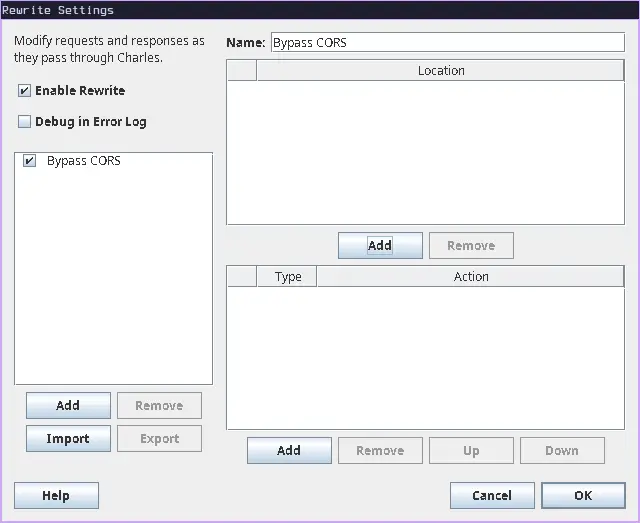
- Rename the rule to your liking and add a location to which the rule should be applied to
- Protocol: Here you can select your site’s protocol http or https
- Host: Here you can enter the host/domain that you want to apply the rule to.
- Port: You can specify the port on which your site is running.
- Path: Define the path if you want the rule to apply only to specific paths on the host.
- Query: Here you can define the query parameters which should be targeted.
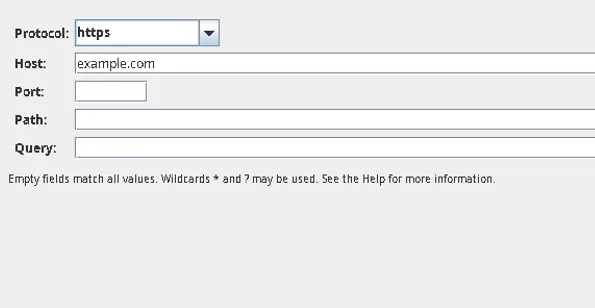
- Now Save the location and click on add in the actions section
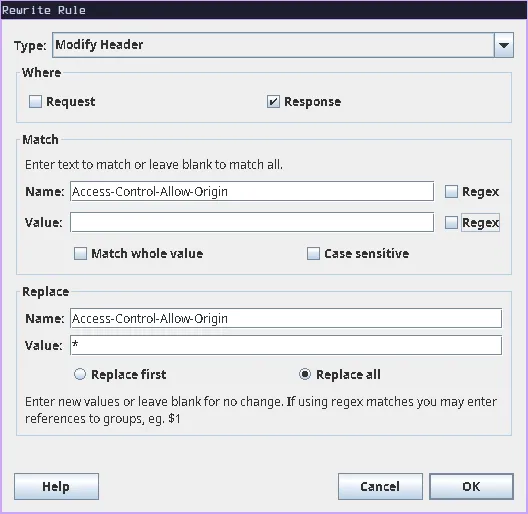
- Type: The type tells Charles what to modify. Here we want to select
Modify header. - Where: Decide whether to apply the change on the request, the response, or both. Since we want to allow CORS we will modify only the response.
- Match: You need to tell Charles when to apply the rule. This is done by matching specific text in the request or response, such as a URL, a header, or a status code. Here we want to replace the value of
Access-Control-Allow-Originregardless of its current value so we will match the name and keep the value field empty to match all values. - New/Replace: Once a match is found, Charles either adds or replaces the text you’ve specified. For example, in this case we want to change the
Access-Control-Allow-Originheader, Charles will replace it with the new value we provided.
Tips:
- Rewrite rules can be tricky to get right. It’s best to test them in small steps and make sure they work as expected.
- Regex makes matching flexible but more complex, so use it carefully if needed.
- After saving this you should be able to see the rule and its modifications
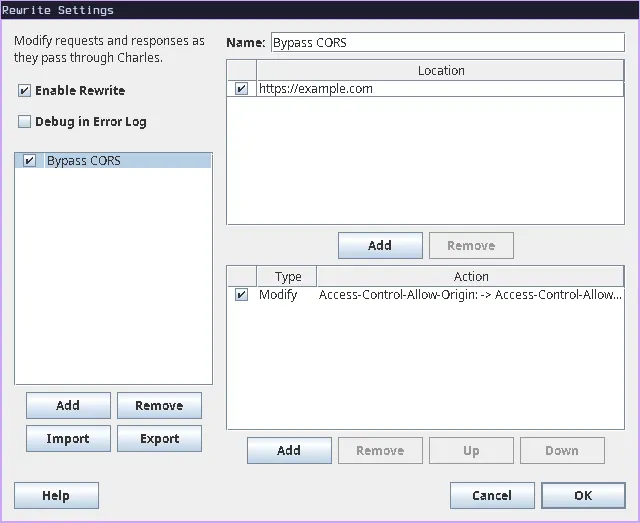
- Now visit the site you selected and you can see the header in developer tools
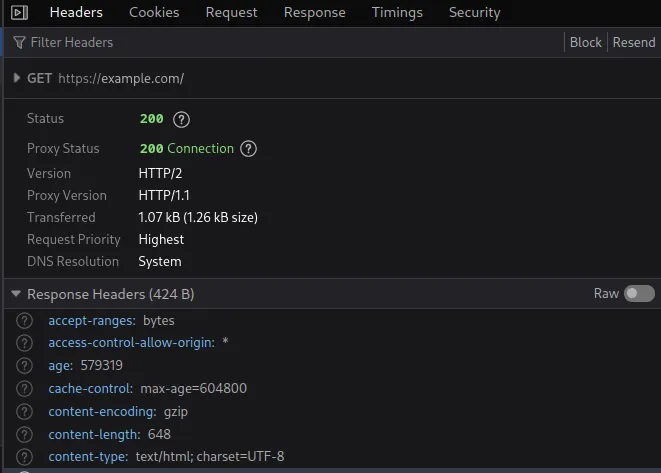
I hope you are able to configure the Rewrite Header tool. If you are facing issues with the setup of SSL, read about SSL setup on the Charles Proxy official documentation.
Due to the complicated setup process of Charles Proxy and issues with VPN, we, at Requestly, came up with a smart solution. We developed a Browser Extension that can sit inside the browser and use the browser’s APIs to intercept and modify your network requests and responses.
Modify Header Rule in Requestly
Requestly is designed differently, so it doesn’t need any SSL configuration and hence works seamlessly with your VPNs. The Rewrite Header is simplified as “Modify Header Rule” in Requestly. With just two inputs, i.e., source URL matching condition and header value.
There are more advanced rules in Requestly and other features to help you test the working of the rule, along with details of how to use this rule, which are explained below.
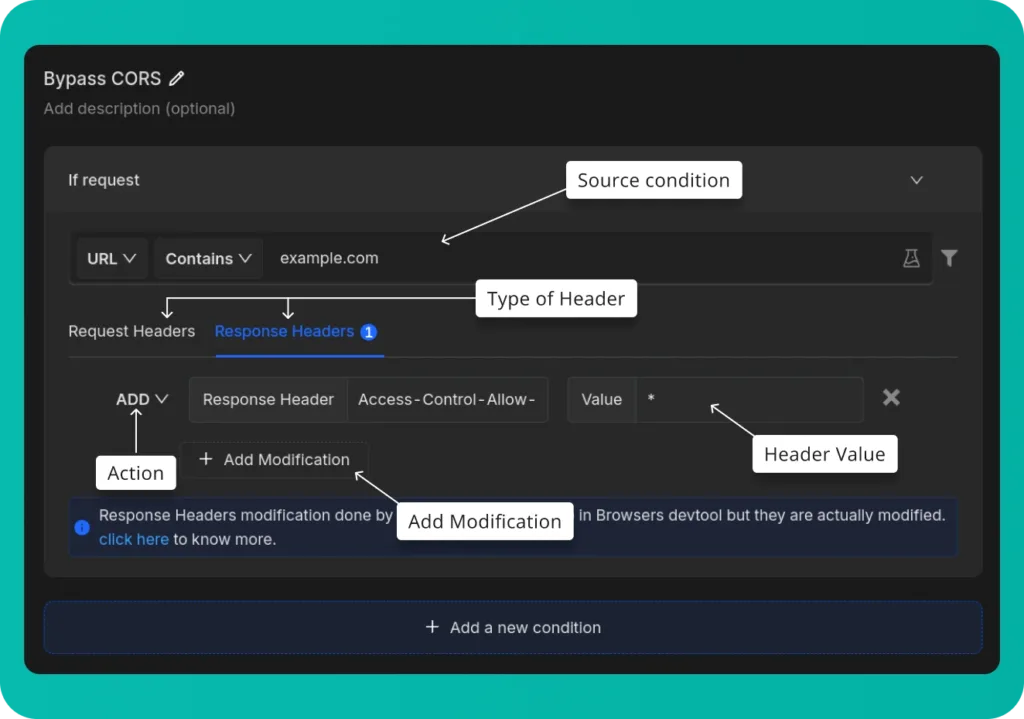
- Source Condition: This determines which requests will be redirected.
- Type of Header: Select the type of header you want to modify, you can add separate modifications to both
- Header Value: Enter the header you want to remove.
- Action: The type of modification you want to do to the header
- Add Modification: Include additional header modifications.
Steps to Configure Requestly’s Modify Header Rule
- Install Requestly Extension: Download and install Requestly’s browser extension.
- Open Requestly Dashboard: Visit app.requestly.io and log in.
- Click on the Rules tab and then select New Rule.
- Choose Modify Header as the rule type.
- Enter the URL or URL pattern in the Source Condition field.
- Specify the headers you want to add, modify, or remove .
- Name your rule and click Save.
After saving the rule, you can test it on your desired API. For convenience, we’ve also created a shared rule for Modify Header, which you can import by clicking the button below.
Or create your own Rule by following the setups below
Other Use Cases
Modify Header rule in Requestly is a powerful tool and can serve many purposes. It can also be used for other use cases like:
- Add Custom Authentication Tokens: You can automatically add authentication tokens to requests by modifying headers like
Authorization. This is helpful for testing APIs or accessing resources that require token-based authentication. - Controlling Cache Behavior: Add or modify cache-control headers such as
cache-controlto ensure you’re testing the most up-to-date versions of your assets. - Simulate Different Languages: Adjust the
Accept-Languageheader to test how your website appears in different languages, ensuring that localization and internationalization are functioning correctly.
Migrate from Charles proxy
If you’re already using Charles Proxy, Requestly provides an easy way to import your settings. Follow the guide to migrate: Migrate from Charles Proxy.
Conclusion
I hope you have got a clear understanding of both the Rewrite Header tool in Charles Proxy and how Requestly can achieve the same results with greater ease. While Charles Proxy effectively handles the task, Requestly offers a modern, simple and efficient experience.
Since Requestly operates directly from your browser and leverages built-in browser APIs, there’s no need for complex SSL configurations, eliminating the VPN issues often encountered with Charles Proxy. Plus, you don’t need to switch between different tools — everything you need is right in your browser.
Love for Requestly is reflected in its 4.4 ⭐ rating from over 1,200 users on the Chrome Web Store. Requestly is being used by 200K+ developers across the world.
Explore More
Contents
Subscribe for latest updates
Share this article
Related posts
Get started today
Requestly is a web proxy that requires a desktop and desktop browser.
Enter your email below to receive the download link. Give it a try next time you’re on your PC!


