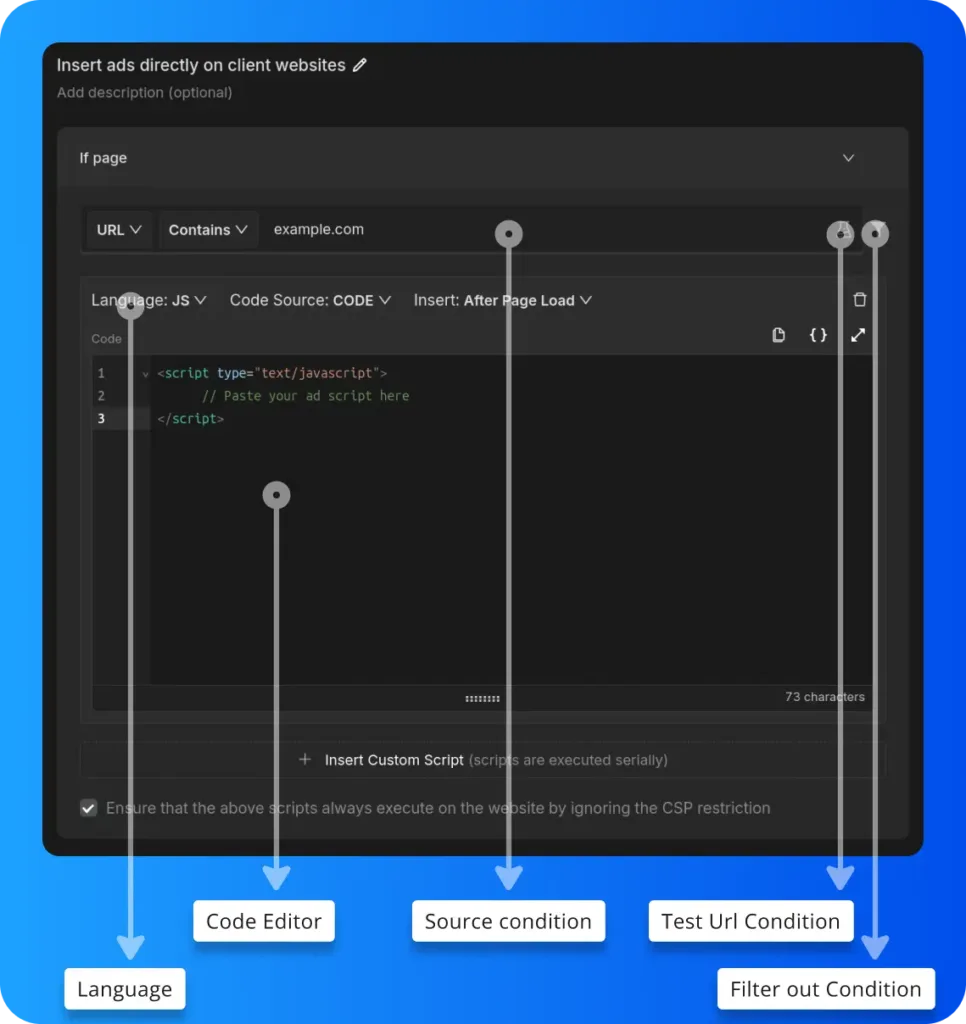
The Insert Script Rule in Requestly allows you to inject ad scripts directly into client websites, enabling seamless testing of ad demos. This is especially useful for showcasing different ad versions or configurations in a live environment, providing real-world performance insights without altering the client’s production setup.
Simplify Demos by Directly Testing Ads on Client Websites
Kanishk Rawat
September 24, 2024
3MIN READ
Easily test ads on client websites by injecting them directly. Ensure seamless performance with real-time demos and targeted page testing.

Introduction
When you’re trying to sell ads, it’s important to show potential clients how those ads will look on their actual website. But getting ads integrated into a client’s website for a demo can be slow and frustrating. Imagine if you could skip all that and just show the ads right away, no technical setup needed.
With Requestly, you can do just that. It lets you display ads directly on any website during a sales demo, without needing any integration or backend changes. This means quicker, smoother demos that can help you close deals faster.
The Problem
Running a live demo of how your ads will look on a client’s website is often complicated. Normally, you need to ask their team to add scripts, or you end up using a staging version of their website, which can take time and technical work.
Existing Solutions
Here’s what people typically do:
- Staging Sites: Set up a separate copy of the client’s website and add the ads there.
- Manual Integration: Have the client’s team insert the ad script onto their actual website for the demo.
Both approaches are far from ideal. They take time, involve extra coordination, and aren’t very flexible if changes are needed on the spot.
Problems with These Solutions
- Time-Consuming: The process of setting up a staging site or awaiting manual integration can take considerable time, often extending the sales cycle.
- Technical Complexity: Successful integration typically requires assistance from developers, which can complicate the demo process.
- Inefficient Demos: Dependence on the client’s technical team or the use of a staging site can lead to delays, impacting the overall effectiveness of your demonstration.
How to insert ads directly on client websites for sales demos

- Language: Choose the coding language for the script you want to inject. In this case, both
JavaScript (JS)andCSScan be selected depending on whether you’re writing behavior-related code (JS) or styling (CSS). - Code Editor: This is where you write or paste your
JSorCSScode. For JavaScript, you might insert custom ad scripts, while for CSS, you might apply custom styles to adjust how ads are displayed. - Source Condition: This allows you to set up specific conditions, such as URL patterns, to target particular domains or requests. For example, the URL is set to
example.com - Test URL Condition: You can check if the rules you’ve set up work correctly by testing them on specific URLs.
- Filter Out Condition: You can apply
filtersto limit which requests are affected, making sure only the ones you want are modified.
Or create your own Rule by following the steps below
Here’s how to set up a rule to test ads directly on client websites using the Insert Script Rule in Requestly:
- Open Requestly: Open Requestly app.
- Create a New Rule: Click on
New Ruleand select theInsert Script Ruleoption. - Enter the URL Pattern: Specify the URL condition where the ad script should be applied. (Client’s website)
- Insert the Ad Script: Paste the ad script that you want to test on the client website.
- Save the Rule: Click
Saveto apply the rule.
Interactive Guide
Check this interactive and easy explanation of how to use Insert Script Rule.
Conclusion
Try this Insert Script rule to test ads directly on client websites, ensuring accurate demos without impacting live data. Requestly is trusted by over 200k developers and 1000+ companies for seamless network request management.
Explore More:
Written by
Kanishk Rawat
Kanishk Rawat, a tech enthusiast since childhood, has mastered programming through dedication. Whether solo or in a team, he thrives on challenges, crafting innovative solutions .
Contents
Subscribe for latest updates
Share this article
Related posts


