Simplifying API Testing with Requestly API Mock Service
Your lightweight Client for API debugging
No Login Required
Requestly is a web proxy that requires a desktop and desktop browser.
Enter your email below to receive the download link. Give it a try next time you’re on your PC!


APIs have a crucial role in linking various applications on the internet nowadays. As a developer, you have likely encountered the need to create or use an API for your application. However, how can you efficiently test applications that depend on APIs that are not yet implemented?
This is where an API mock server becomes useful. It enables you to imitate the actions of a real API by utilizing a dummy API specifically designed for testing and feature development within your application.
In this article, we will delve into the Requestly API Mock Service, which aims to streamline API testing and development.
What is an API Mock Server?
Let’s start by understanding the concept of an API mock server.
An API mock server functions as a server that imitates the behaviour of a genuine API server. With the help of a mock server, you can perform various tasks such as defining customized API routes and response headers, as well as simulating API latency.
The main advantage of utilizing an API mock server is that it allows you to continue developing and testing your application, even if the real API is not yet fully accessible. This enables you to expedite the feature development process since you are no longer dependent on the actual API being fully implemented.
Once the APIs are eventually implemented, you can effortlessly replace the mock endpoint in your code with the actual endpoint.
Introducing Requestly API Mock Service
Requestly’s API mock service is an accessible server that offers a wide range of features specifically designed to assist you in API testing. With this service, you can effortlessly create and handle mock endpoints, specify customized response bodies and headers, define your own API routes, incorporate custom latency, and much more. The best part is that you can enjoy all these benefits without the need to construct the actual API. Cloud-based mocks enable integration with CI/CD pipelines as well.
Additionally, the mock server can be utilized collaboratively with other developers in your team, promoting seamless teamwork and cooperation. Now, let’s delve into each of these features in detail to gain a comprehensive understanding of their significance.
Create a mock GET API with Requestly Mock Server
Before we get into the specific features the mock server provides, let me show you how you can create a simple GET API in seconds using Requestly’s mock server:

Since this is a simple GET request, we should also be able to send this via our browser. Let’s try that as well:
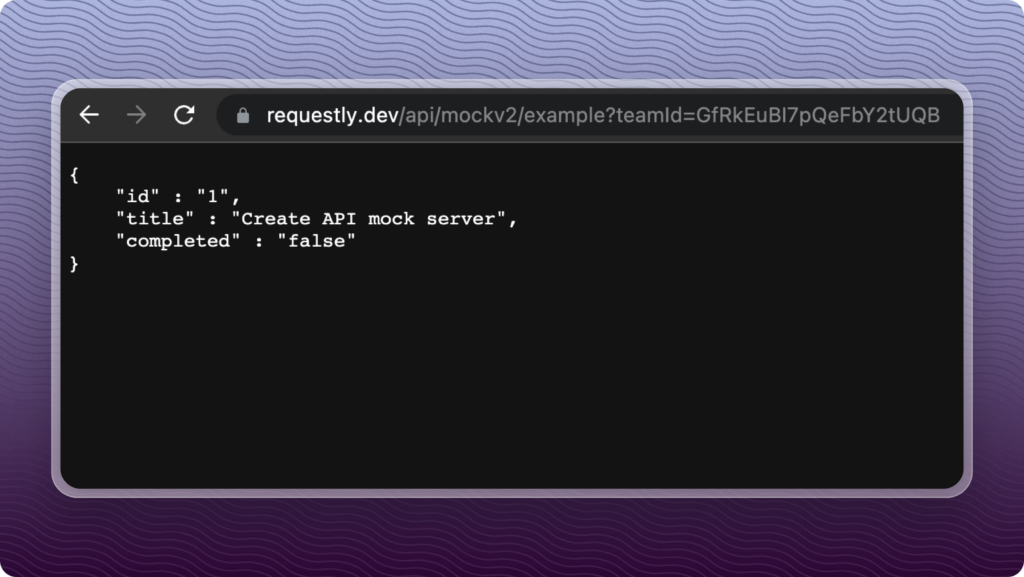
Great, let’s explore the mock server further and understand what else we can do.
Define Custom Response Body and Headers
You’ve already seen how we defined a custom response body. If you’re struggling to create a custom response body, you can also use the built-in AI response generator that generates some dummy responses for you.
Let’s now update our mock server to return a list of todos, only this time, we’ll ask AI to generate a list of todo items for us as a custom response:
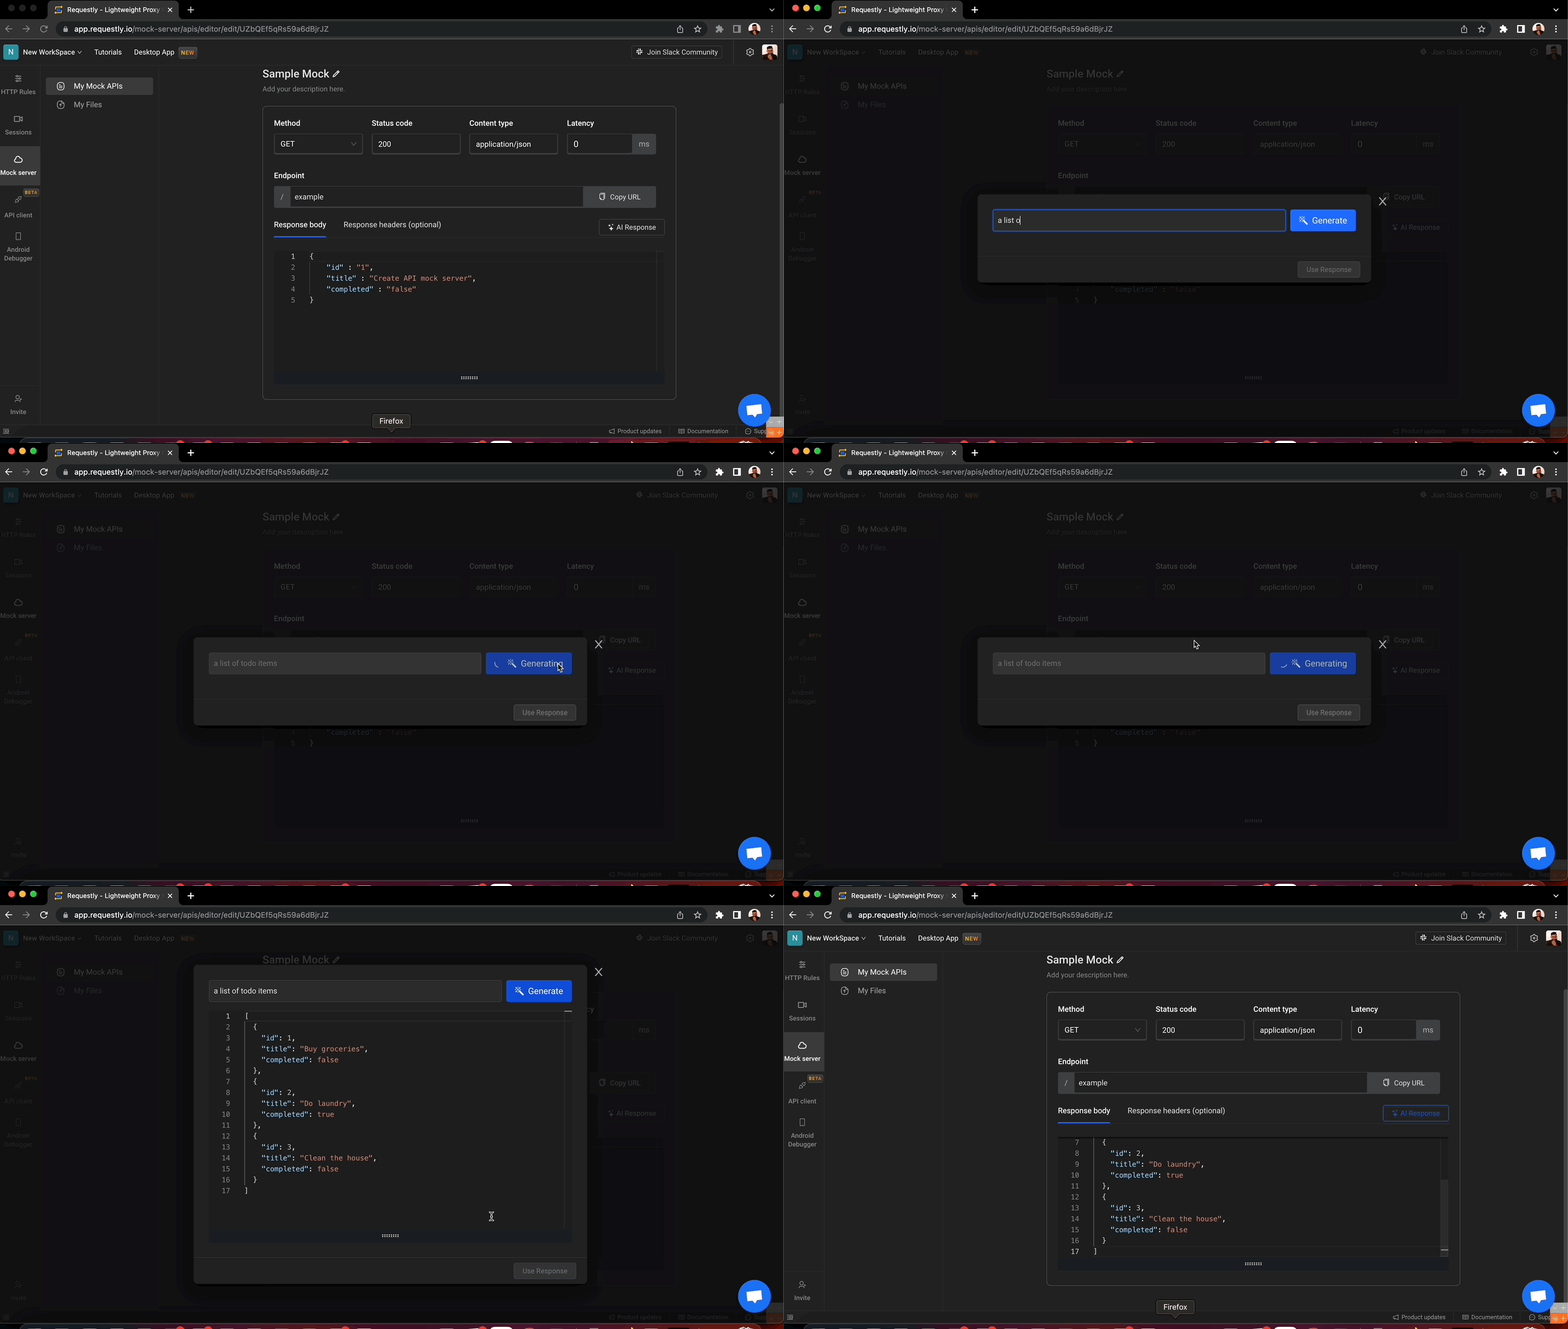
Now, let’s also define some custom response headers by heading over to the Response Headers tab:
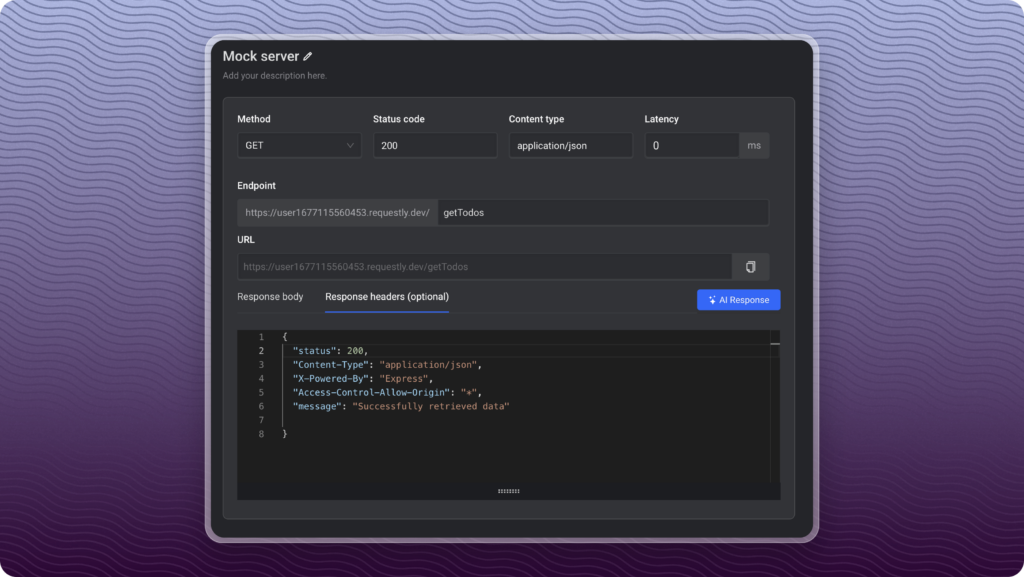
Great! Now let’s go ahead and test these changes. As you can see, we now have the new response in the Response Body tab:
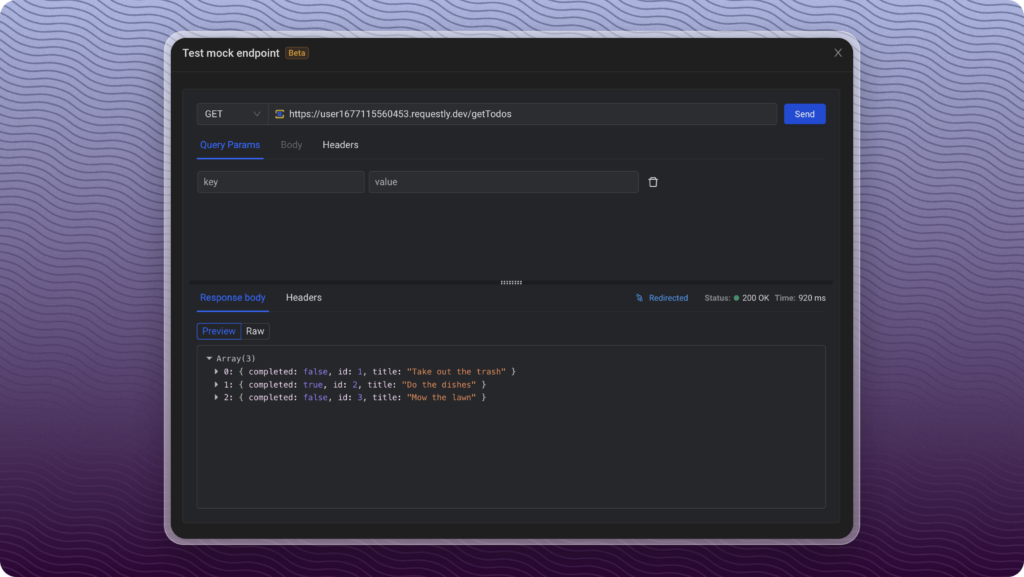
And our custom headers also appear in the Headers tab of the response:

Defining custom response bodies and headers gives you the flexibility to simulate multiple scenarios that you can use to test how your application will need to handle different types of responses.
Define Custom Latency
In reality, APIs are not always lightning-fast. You can introduce custom latency to the API response to simulate network delays and mimic real-world scenarios. Let’s revisit the mock API we previously created in the last section.
We’ll add a 5 seconds delay by setting the latency to 5000ms under the Latency field. And then 5 seconds later, you should see the response back:
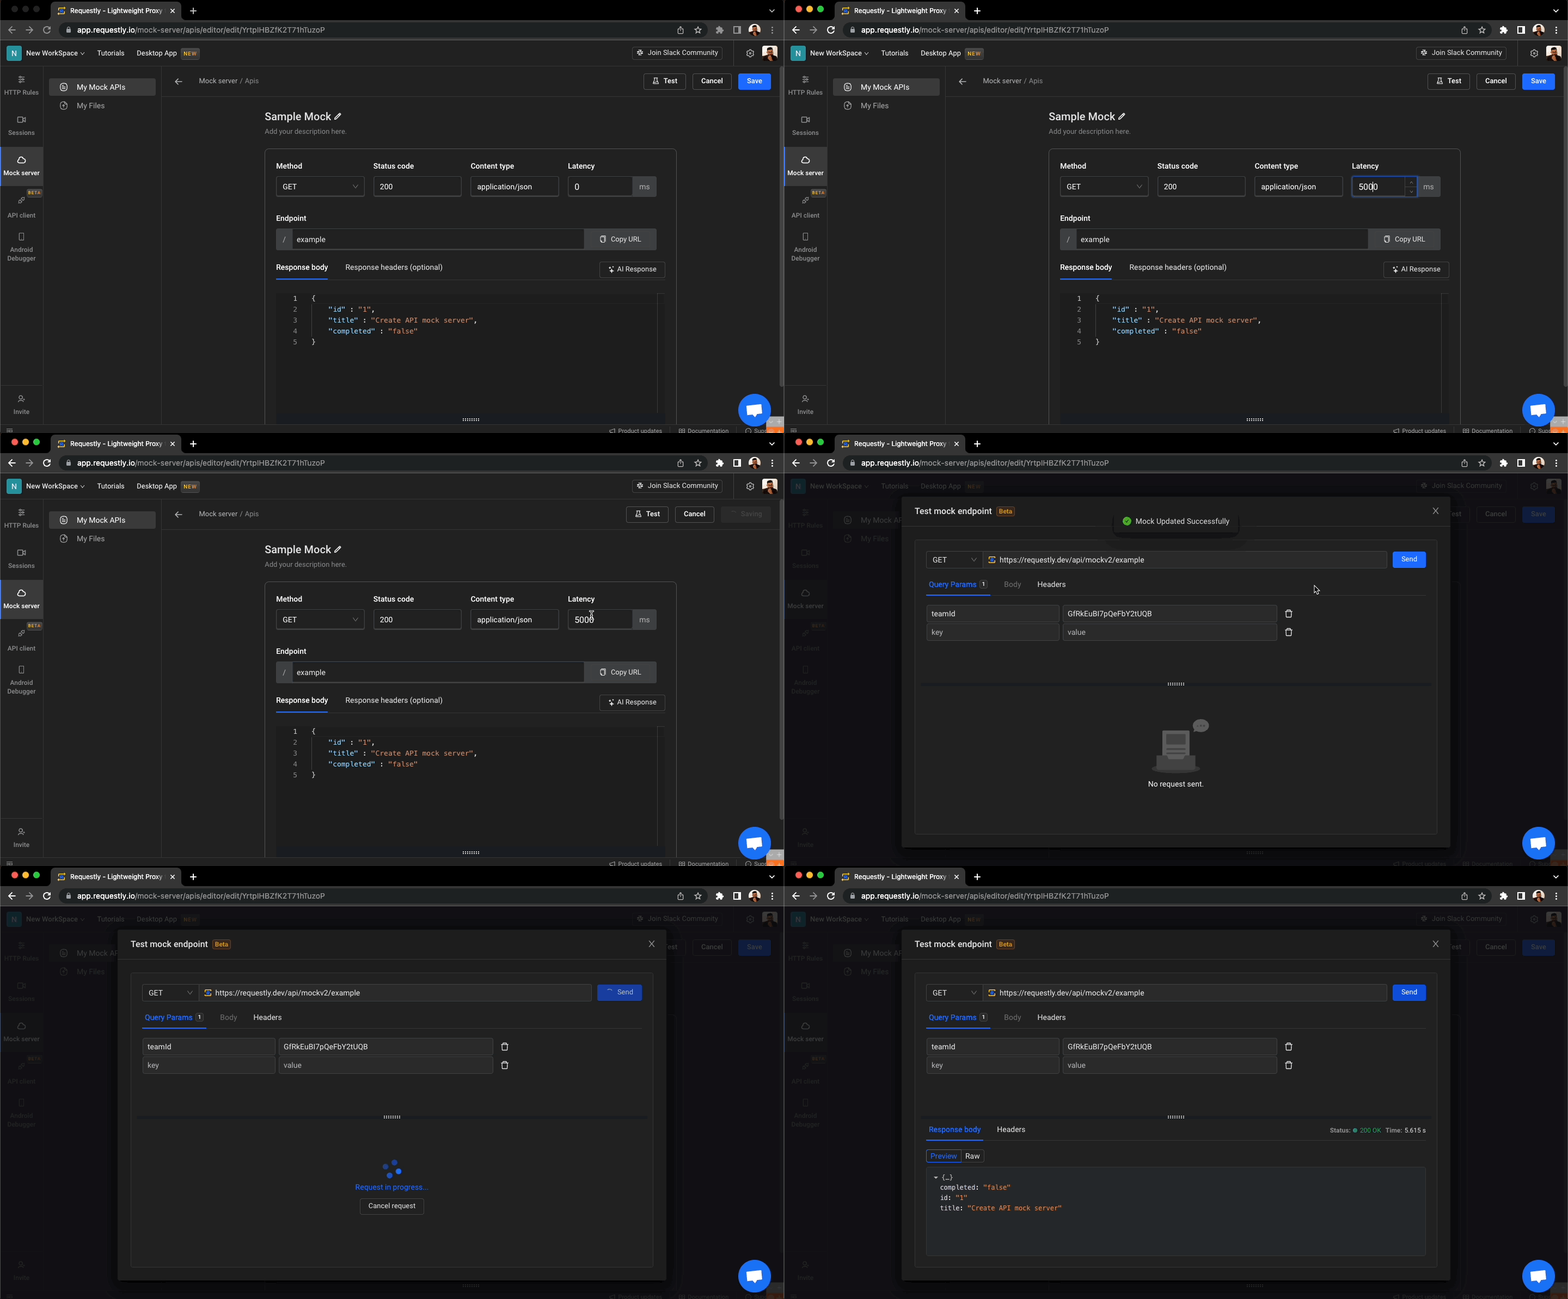
You can set custom latency to your requests to simulate slow network conditions and use that to test how your application performs to improve the user experience for slower networks.
Defining your Own API Route
You can define your own custom API endpoints and routes when working with the mock server. For instance, let’s say we have to fetch a single to-do item by its id. We can use a route like getTodo/1 that returns just the todo list item pertaining to that id:
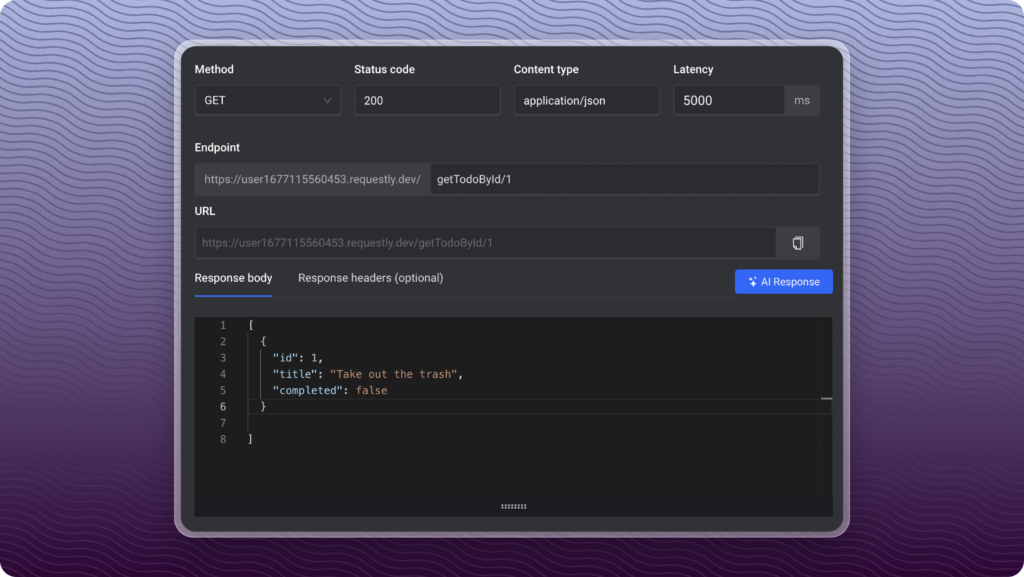
And now, if you send that request, you’ll only get data for that id:
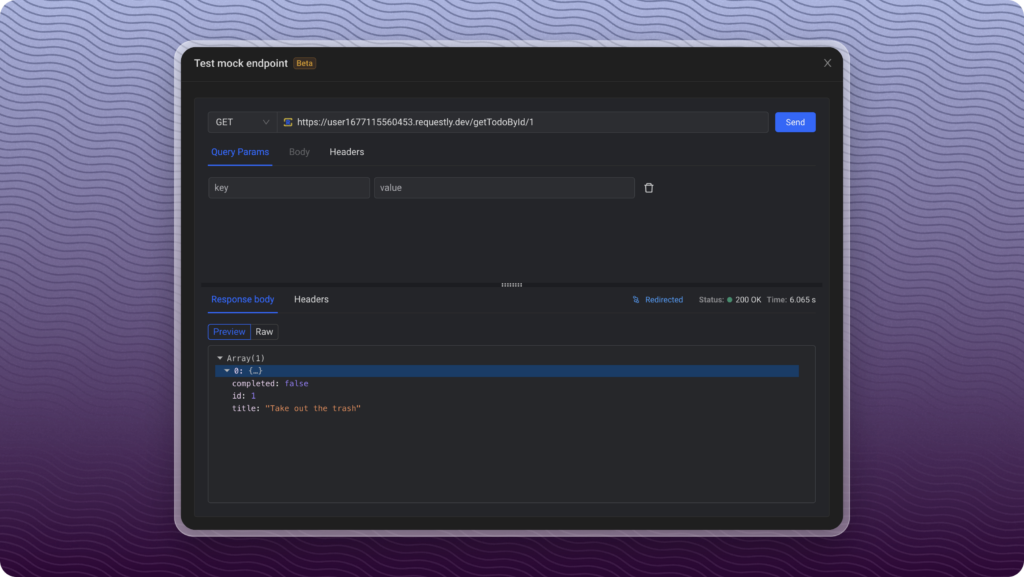
Defining your own API route gives you the flexibility to use the mock API the same way you’d define the routes of the real API.
Collaborate with Teams using Team Workspace
Collaboration plays a vital role in enhancing productivity, particularly in software development. Requestly allows you to create a workspace within the app to facilitate seamless collaboration with other developers and QA engineers. This workspace is a shared environment where team members can collaborate effectively, leading to improved efficiency and better software outcomes.
This feature can greatly simplify the lives of other QA engineers on your team. With the ability to update the mock server’s response, headers, latency, and more, they can easily test your application’s behavior in various scenarios. This allows them to efficiently assess the application’s performance and functionality without relying on the availability of the actual API. It empowers them to simulate different conditions and thoroughly evaluate the application’s behavior, contributing to a smoother and more reliable software testing process.
Check out the Requestly’s Team workspace in this video:
Define HTTP Methods and Status Codes
Up until now, we’ve only seen GET requests with the mock server. However, you can define other HTTP methods and even set custom status codes for your request. Let’s see a simple example.
I have a new mock server API, a POST request to create a new to-do object in the database. I’ve set the method to POST with a custom response, as shown below:
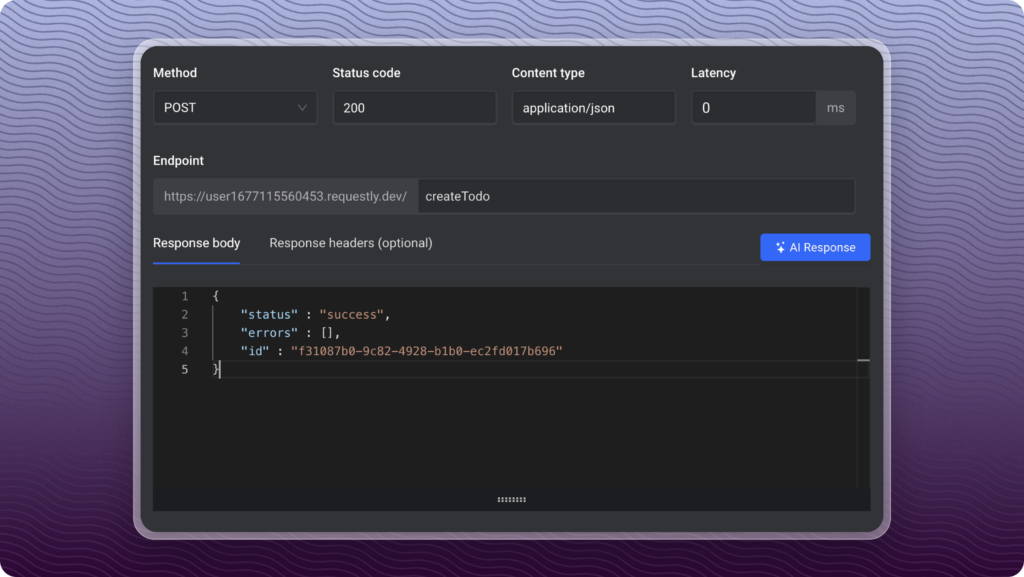
When we test the API, we get the custom response back from the POST request the same way we got it for the GET request. Now, let’s update the request such that it gives us a 400 status code instead of 200 with an error.
I’m simulating the error when the title property of a todo object is sent as a blank string in the POST API:
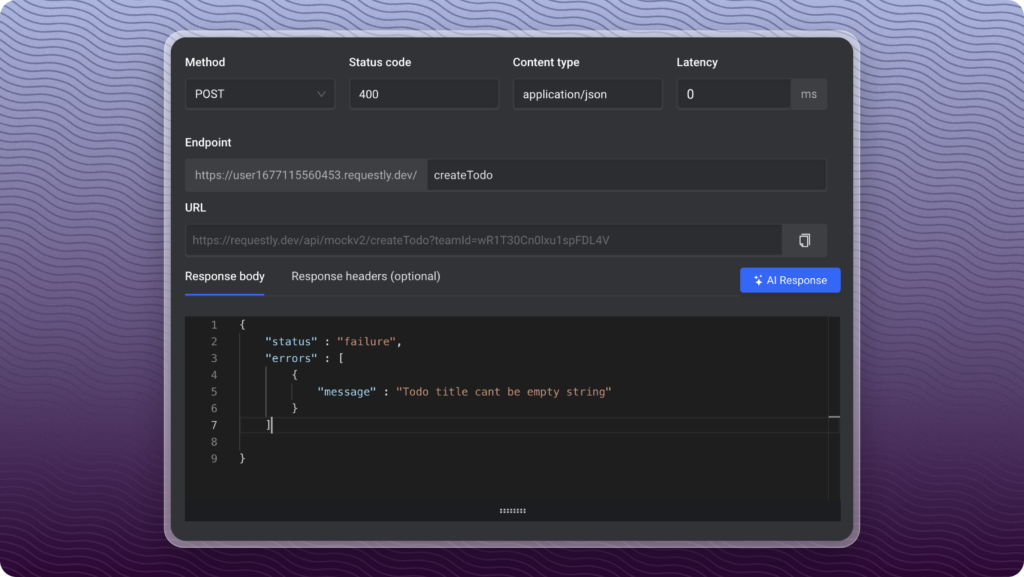
If you now hit this request with a todo object with title property as an empty string, you should get back a status of 400 instead of 200 in the previous case:

You can use the mock server in the same way to test PUT, PATCH, DELETE, and UPDATE requests. You can also test this for various other status codes.
Use Cases
Now that we’ve seen how Requestly mock service works, let’s understand some common use cases where such a tool would be extremely helpful to you.
Creating Temporary APIs
In many cases, front-end developers encounter situations where they need to build a feature that relies on certain API endpoints. However, these API endpoints are often not yet available when the developer needs to start consuming them. As a result, the frontend developer is left with limited options—they either have to wait for the APIs to be implemented or remain idle, unable to proceed with their work.
To overcome this challenge, the developers can utilize the Requestly API mock service to simulate responses similar to the real API. This way, they can continue developing and testing their front-end code without being hindered by backend dependencies. This enables them to be productive and make progress on their work even before the actual APIs are fully implemented.
Working with Status Codes and Redirects
In real-world scenarios, APIs often encounter errors and return unfavourable responses. Unfortunately, developers tend to overlook the handling of these error scenarios, which can negatively impact the user experience on the front end.
Thankfully, the Requestly API mock service offers a solution. You can utilize custom status codes such as 400, 404, or even 500 and implement code to handle these error cases effectively. This allows you to test and verify whether your application can appropriately handle such error responses. For instance, your application should be able to redirect users to the necessary pages or update the user interface based on the received status code.
By incorporating these error-handling mechanisms during development and testing using the mock service, you can ensure that your application handles and responds to API errors gracefully, enhancing the overall user experience.
Store API Responses (or JSON Files) for Future References
During the development process, having access to real API responses can be beneficial for reference or offline testing purposes. The Requestly API Mock Service offers a convenient solution by allowing you to store API responses as JSON files. This feature ensures that the API responses are readily available for future use.
Storing API responses as JSON files proves particularly useful when you need to reproduce specific scenarios or test offline functionality. By leveraging this feature, you can easily retrieve and utilize the stored API responses, enabling efficient testing and accurate replication of various scenarios even without an active internet connection.
Conclusion
The Requestly API Mock Service is an immensely powerful tool that simplifies API testing and development through its user-friendly interface and robust set of features. Whether you need to simulate API endpoints, define custom routes, set response bodies and headers, or introduce latency, this tool offers comprehensive solutions. Additionally, its team workspace and flexible configuration options make it an invaluable asset for developers and teams aiming to streamline their API testing and development processes.
By leveraging the Requestly mock server, you can ensure that your front-end developers can continue their work without being dependent on the backend. This empowers them to remain productive and carry out API testing and development tasks smoothly.
Contents
- What is an API Mock Server?
- Introducing Requestly API Mock Service
- Create a mock GET API with Requestly Mock Server
- Define Custom Response Body and Headers
- Define Custom Latency
- Defining your Own API Route
- Collaborate with Teams using Team Workspace
- Define HTTP Methods and Status Codes
- Use Cases
- Creating Temporary APIs
- Working with Status Codes and Redirects
- Store API Responses (or JSON Files) for Future References
- Conclusion
Subscribe for latest updates
Share this article
Related posts
Get started today
Requestly is a web proxy that requires a desktop and desktop browser.
Enter your email below to receive the download link. Give it a try next time you’re on your PC!


