How to Create an Angular HTTP Interceptor from Scratch

Your lightweight Client for API debugging
No Login Required
Requestly is a web proxy that requires a desktop and desktop browser.
Enter your email below to receive the download link. Give it a try next time you’re on your PC!


Introduction
Handling HTTP requests is a big part of building modern web apps. Angular makes this easier with HTTP Interceptors, which let you catch and handle requests and responses centrally. In this guide, I’ll show you how to create an Angular HTTP Interceptor to manage tasks like adding headers, logging requests, or handling errors in one place.
Setting Up Your Angular Project
First, make sure you have Angular CLI installed. If not, you can install it with npm:
npm install -g @angular/cli
Now, create a new Angular project:
					ng new Project_Name
cd Project_Name
Generating the Interceptor
Generate a new HTTP Interceptor with Angular CLI
ng generate interceptor interceptors/interceptorName
This will create two files: interceptorName.interceptor.ts and interceptorName.interceptor.spec.ts in the src/app/interceptors directory.
Implementing the Interceptor
Open interceptorName.interceptor.ts and add the logic for your interceptor. Here’s an example that logs Http request.
					import { HttpInterceptorFn } from '@angular/common/http';

export const interceptorName: HttpInterceptorFn = (req, next) => {
  console.log('HTTP Request:', req);
  return next(req);
};
Registering the Interceptor
To use the interceptor, open app.config.ts and add it to the providers array:
					...
import { provideHttpClient,withInterceptors } from '@angular/common/http';
import { interceptorName } from './interceptors/interceptorName.interceptor';


export const appConfig: ApplicationConfig = {
  providers: [
    ....
    provideHttpClient(
      withInterceptors([interceptorName])
    ),
  ],
};
Testing the Interceptor
Now, let’s test the interceptor.
Update app.component.ts to make HTTP request and see if the interceptor logs the HTTP request
					import { HttpClient } from '@angular/common/http';
import { Component } from '@angular/core';

@Component({
  ...
  template:`
  <p>Angular Interceptor</p>
  <p> Title : {{data.title}} </p>
  <p> id : {{data.id}} </p>
  `,
})
export class AppComponent {
  private apiUrl = 'https://jsonplaceholder.typicode.com/todos/1';
  title = 'InterceptorPractice';
  data: any = {}
  constructor (private http:HttpClient){}
  ngOnInit(){
    this.http.get(this.apiUrl).subscribe((res:any)=>{
      this.data = res
    })
  }
}
Running the Application
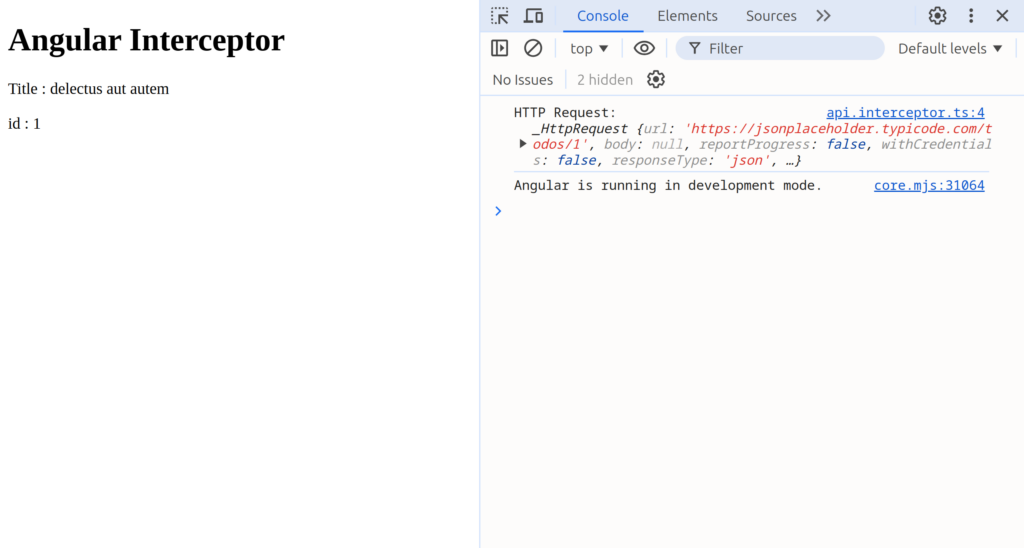
Finally, run your Angular app to see the interceptor in action
ng serve
Open your browser and go to http://localhost:4200. You should see the API response in the console. For a more streamlined experience consider using Requestly, a powerful tool for developers to intercept, modify, and debug network requests effortlessly.

Types of HTTP Interceptors in Angular
HTTP interceptors in Angular are powerful tools that allow you to manage HTTP requests and responses in a centralised manner. They can be used to add authentication tokens, log requests and responses, handle errors. Each type of interceptor serves a specific purpose in your application. Here are some common types of HTTP interceptors.
Authentication Interceptor
The Authentication Interceptor adds an authentication token, such as a JWT, to the headers of outgoing HTTP requests. This ensures that every request sent to the server includes the necessary credentials for user verification. By centralising the authentication logic, this interceptor simplifies secure access to protected resources and ensures consistent token usage across the application.
					import { HttpInterceptorFn } from '@angular/common/http';

export const interceptorName: HttpInterceptorFn = (req, next) => {
  const authToken = 'YOUR_AUTH_TOKEN';
  const clonedRequest = req.clone({
    headers: req.headers.set('Authorization', `Bearer ${authToken}`)
  });
   return next(req);
};
Logging Interceptor
The Logging Interceptor is a valuable tool for debugging and monitoring HTTP requests. It captures and logs the details of every request and response, providing insights into the application’s network activity. By logging request details, such as URL, method, headers, and response status
					import { HttpInterceptorFn, HttpRequest, HttpHandler, HttpEvent } from '@angular/common/http';
import { Observable } from 'rxjs';
import { tap } from 'rxjs/operators';

export const interceptorName: HttpInterceptorFn = (req, next) => {
  console.log('HTTP Request:', req);
  return next.handle(req).pipe(
    tap(event => {
      console.log('HTTP Response:', event);
    })
  );
};
Error Handling Interceptor
The Error Handling Interceptor catches and manages HTTP errors across the application. It handles errors like 404 or 500 responses, displaying user-friendly messages or triggering specific actions. By centralising error handling, it ensures a consistent user experience and helps developers quickly identify and resolve issues.
					import { HttpInterceptorFn, HttpRequest, HttpHandler, HttpEvent, HttpErrorResponse } from '@angular/common/http';
import { Observable, throwError } from 'rxjs';
import { catchError } from 'rxjs/operators';

export const interceptorName: HttpInterceptorFn = (req, next) => {
  return next.handle(req).pipe(
    catchError((error: HttpErrorResponse) => {
      console.error('HTTP Error:', error);
      // Customize this part to show user-friendly error messages
      return throwError(error);
    })
  );
};
Introducing Requestly:
While Angular HTTP Interceptors are powerful, managing and debugging HTTP requests can still be tricky. This is where Requestly comes in. Requestly is a handy tool that lets you intercept, modify, and debug HTTP/HTTPS requests easily.
With Requestly, you can:
- Modify Headers: Add, remove, or change HTTP headers effortlessly.
- Redirect URLs: Redirect requests to different URLs for testing.
- Mock API Responses: Create mock API responses to test different scenarios.
Using Requestly can make managing and debugging HTTP requests much easier, streamlining your development process
Conclusion
HTTP Interceptors in Angular are a powerful feature that allows you to manage requests and responses globally in a centralised manner. By using different types of interceptors, you can handle authentication, logging, error handling, caching, and request/response transformations efficiently. This makes your code more modular, maintainable, and easier to debug.
Contents
- Introduction
- Setting Up Your Angular Project
- Generating the Interceptor
- Implementing the Interceptor
- Registering the Interceptor
- Testing the Interceptor
- Running the Application
- Types of HTTP Interceptors in Angular
- Authentication Interceptor
- Logging Interceptor
- Error Handling Interceptor
- Introducing Requestly:
- Conclusion
Subscribe for latest updates
Share this article
Related posts
Get started today
Requestly is a web proxy that requires a desktop and desktop browser.
Enter your email below to receive the download link. Give it a try next time you’re on your PC!


